

Table of Contents
Pointing is the art of finishing the mortar joints of the walls or similar structures with either cement mortar or lime mortar in order to protect the joints from atmospheric agencies.
Pointing also improves the appearance of the structure. It is done up to the depth of 10 mm to 20 mm.
1. When Pointing is Done?
Pointing is done:
a. Where a uniform and smooth surface is not required.
b. Where the exhibition of the natural beauty of the materials, such as stone blocks, bricks, etc., used in construction is to be made.
c. Where the joints have to be protected against weathering agencies to prevent dampness or leakage.
2. Importance of Pointing
a. It helps to seal the voids or spaces that may carry water.
b. Regular maintenance is reduced if pointing work is done correctly and aesthetically.
c. It gives strong and reliable bond finishing at bricks /stone masonry joints.
3. Uses of Pointing
Some uses of Pointing are:
a. It can be used to fill the gaps at joints of brickwork walls using cement mortar.
b. Repointing can be done to maintain and repair the cracks on the masonry joints.
c. It improves the durability of masonry work.
d. Sometimes, people also point to give an aesthetic look to their building.
4. Mortars Used in Pointing
a. Lime Mortar
Lime mortar is prepared by mixing a suitable proportion of fat lime, fine sand, and water. Generally, lime mortar with a 1:2 or 1:3 ratio is used for pointing work.
It is used in the pointing of:
i. New buildings and structures with traditional methods
ii. Old buildings
b. Cement Mortar
Cement mortar is prepared by mixing a suitable proportion of cement, sand, and water. Generally, cement mortar with a ratio of 1:3 is used in pointing work. The prepared Mortar should be used within 30 minutes to avoid the early setting of the Mortar.
It is used in the pointing of new buildings as well as old buildings.
c. Surkhi Mortar
Surkhi mortar is a mixture of lime, surkhi, and water in a suitable proportion. Generally, surkhi Mortar of ratio 1:2 is used in pointing work.
It is mainly used in the pointing of old buildings and structures.
5. Types of Pointing
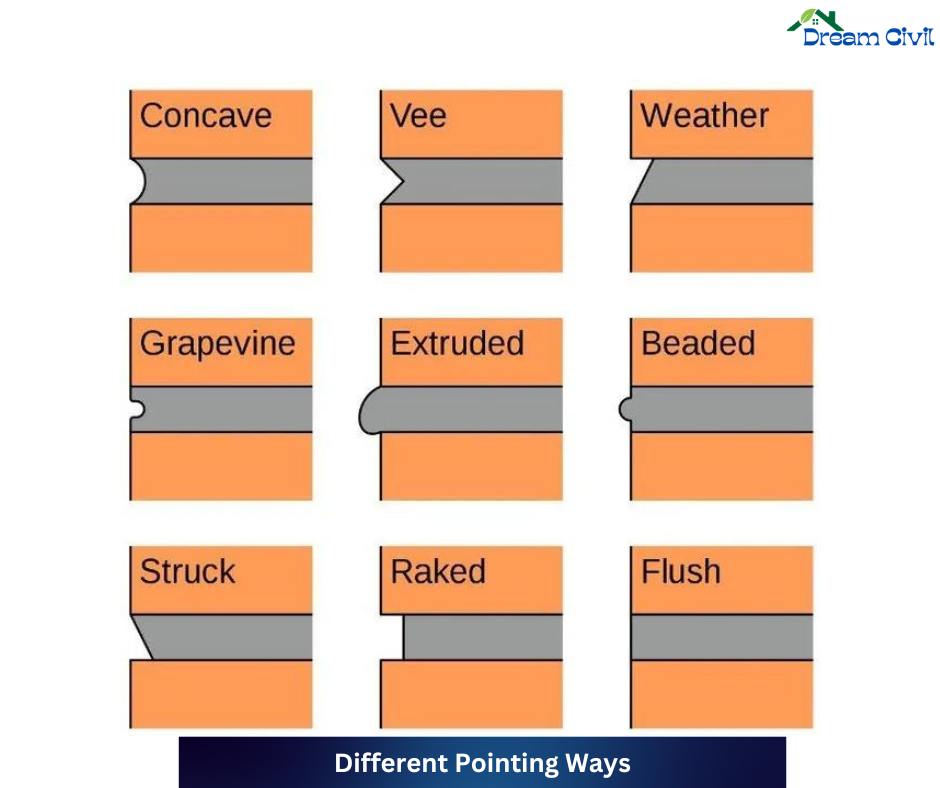
a. Struck Joint Pointing
✔ First, the process involves filling and pressing the Mortar to match the face of the brick masonry work. Subsequently, the top edge of the joint is pressed inwards about 10 mm more than the bottom corner.
✔ This results in a sloped surface from top to bottom, facilitating the rapid drainage of rainwater from the wall.

b. Tuck Pointing
✔ To achieve accurate pointing, press the Mortar firmly into the raked joint until it reaches the surface.
✔ While the Mortar is still fresh, create a narrow groove or channel in the center of the joint, measuring 5mm in width and 3mm in depth.
✔ Proceed to fill this groove with white cement putty, ensuring to leave a 3mm projection beyond the joint surface.
✔ If the projection is carried out with the Mortar, it is commonly known as bastard pointing or half tuck-pointing.

c. Recessed Joint Pointing
✔ To achieve recessed joints, it is advisable to push the Mortar back from the edges by at least 5 mm while ensuring that the pointed face is kept vertical.
✔ For optimal results, using bricks with exceptional frost resistance is recommended. This method not only enhances the visual appeal but also ensures durability.

d. Flush Pointing
✔ For this technique, the Mortar is firmly pressed into the raked joints and smoothed out until it is flush with the edge of the masonry units.
✔ After that, the edges are neatly trimmed using a trowel and straight edge.
✔ While it may not have the same visual appeal as other methods, flush pointing is highly durable and can resist dust and water accumulation. Due to this, it is a commonly utilized approach.

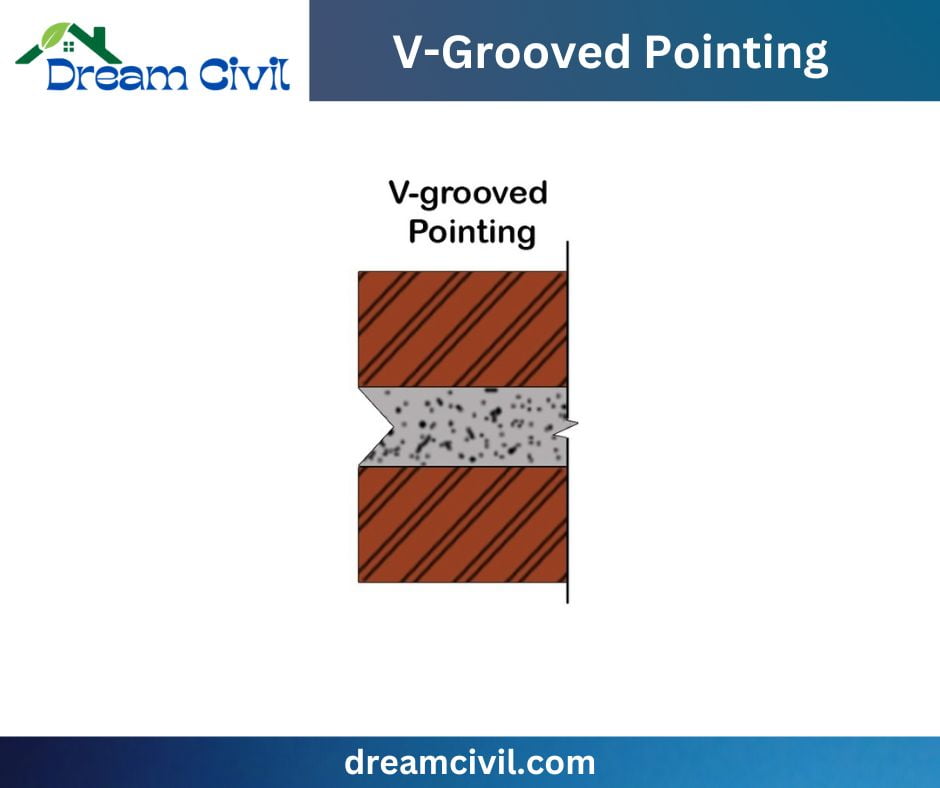
e. V-grooved Pointing
✔ V-grooved pointing is a method of filling Mortar into a joint and creating a V-shaped groove using a V-shaped tool.
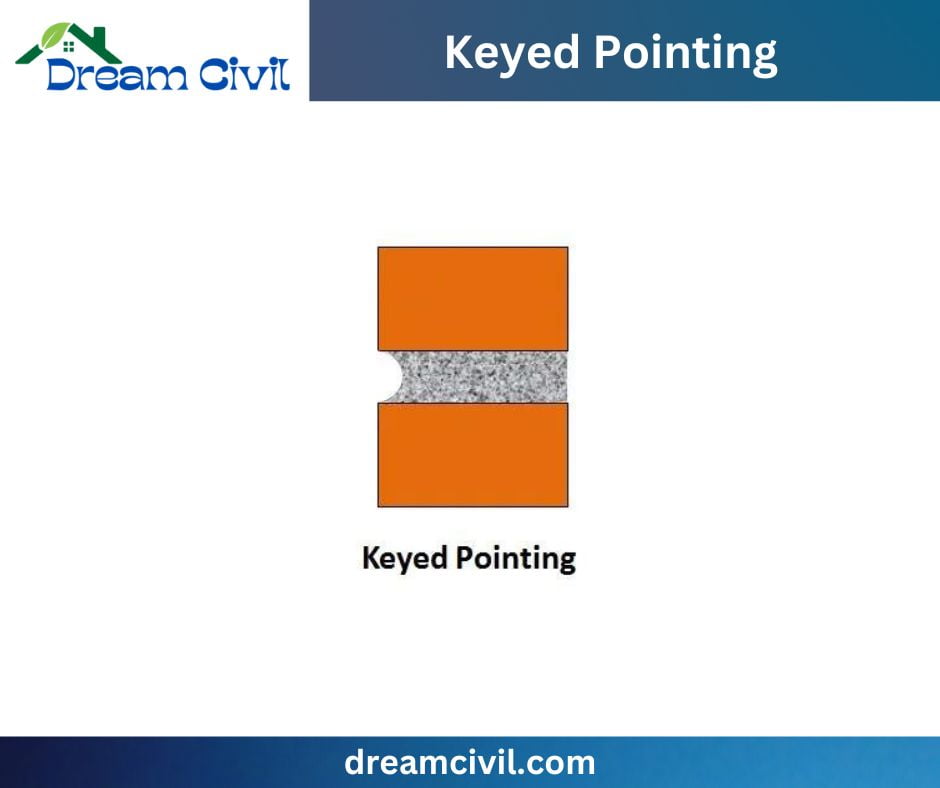
f. Keyed Joint Pointing
✔ When employing the Keyed pointing technique, a trowel is utilized to apply the Mortar to the joints and subsequently level with the surface of the masonry.
✔ Then, a slender steel rod measuring 6mm in diameter is employed to push the joint backward, resulting in a curved arc groove in the Mortar.
✔ This procedure is duplicated for the vertical joints, too. For this process, the joints are first filled with Mortar. Next, a tool or small steel bar forms a semi-circular notch. This pointing style produces a striking visual effect on walls and is frequently employed for top-notch craftsmanship, especially on vertical joints.
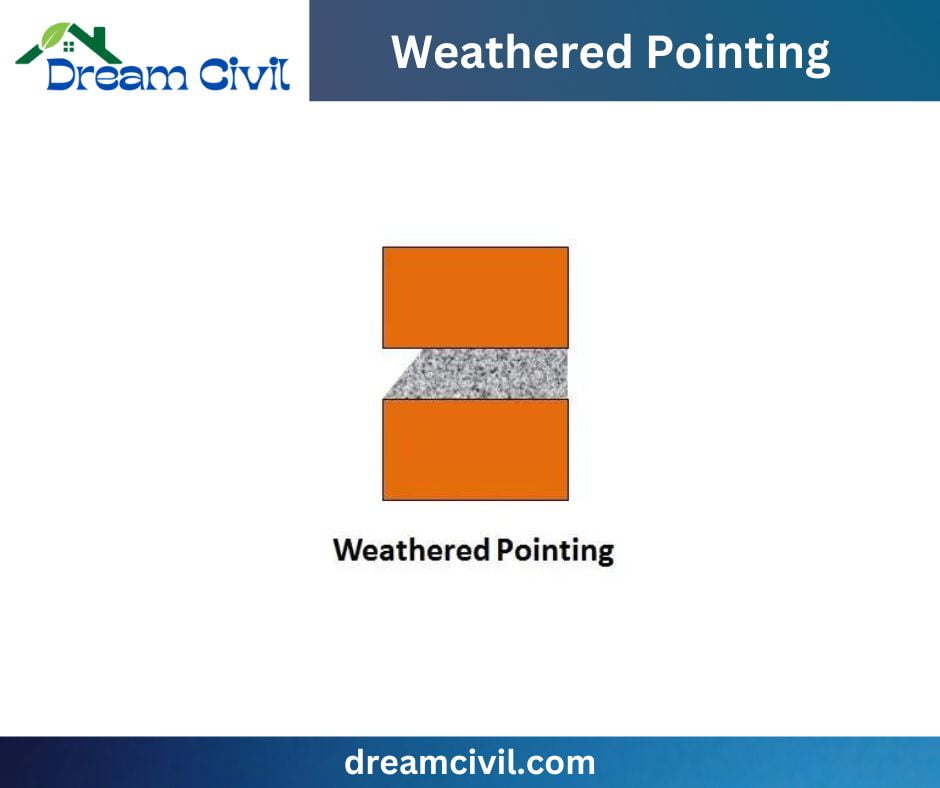
g. Weathered Joint Pointing
✔ In Weathered Pointing, the Mortar is firmly pressed into a joint.
✔ Additionally, the top of each horizontal joint is neatly pressed back by 3-6 mm using a pointing tool while still fresh.
✔ This technique results in the joints having a sloping appearance, with the top being wider than the bottom.
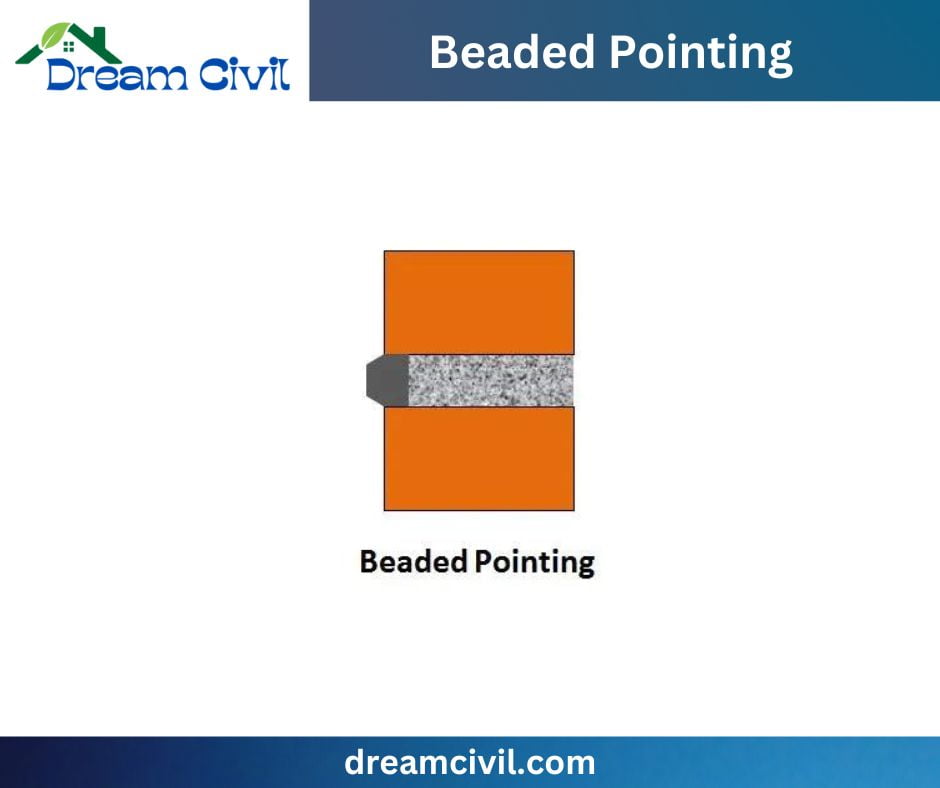
h. Beaded Pointing
✔ Beaded Pointing involves pressing Mortar into a masonry joint and creating concave grooves using a steel tool with a concave shape.
✔ This method produces an aesthetically pleasing mortar joint but is susceptible to damage.
6. Procedure for Pointing
✔ Before pointing, all the mortar joints on the face are raked out by a unique pointing tool to a depth of about 7/4 cm to provide an adequate key for the fresh Mortar used for pointing.
✔ All the loose Mortar and dust are then brushed out of joints, and the wall surface is well washed, wetted with clean water, and kept wet for a few hours.
✔ The joints, after being prepared, are filled with lime or cement mortar with a small trowel.
✔ The Mortar is well pressed into the joints to ensure solid contact with the internal old mortar joints. Excess Mortar sticking to the sides is scraped away carefully.
✔ The finished pointing is kept wet for about 4 days for lime pointing and 10 days for cement pointing.
7. Precautions for Pointing
a. Mortar used should be fresh.
b. In old structures or buildings, the joints should be wetted properly before starting pointing work as Mortar may not stick on a dry surface.
c. Type of Mortar and pointing should be chosen per the job/work requirement.
d. Pointing work should not be carried out during the frost weather as it may lead to the disintegration of joints due to the action of freezing.
8. Advantages of Pointing
a. It avoids cracking and shrinkage at joints.
b. It provides resisting property to bricks and stones masonry against weathering to some extent.
c. Stone masonry may be defective, for which Portland cement can be used in Mortar for tuck-pointing to maintain and repair the damage.
d. Voids or spaces between brick/stone masonry can be fixed by pointing work to reduce the entrance of water through it.
e. Thermal property of the wall can be maintained by insulating the cavities with repointing work.
f. Repointing integrates the structural parts with brickwork, giving enhanced finishing.
g. It reduces further damage to the brick wall.
h. It requires less cement mortar.
9. Disadvantages of Pointing
a. It is reliable only for joint fillings.
b. It cannot be done for the interior part of the walls.
c. It doesn’t give a smooth and plain aesthetic appearance if done incorrectly.
d. Brick/stone masonry may have defects even after pointing.
e. This can’t be done in areas with heavy rainfall.
f. Inadequate pointing may result in a spider web effect on stonework with cracks.
h. Bricks/stone masonry pointing can be challenging to paint.
10. Differences Between Pointing & Plastering
| Feature | Pointing | Plastering |
|---|---|---|
| Area covered | Exposed joints only | Entire surface |
| Purpose | To seal and protect joints, improve structural integrity, and enhance appearance | To smooth and even surfaces, provide a base for finishes, and improve thermal and acoustic insulation. |
| Surface finish | Rough | Smooth |
| Application | To brickwork, stonework, and blockwork | To brickwork, stonework, concrete, and plasterboard |
| Examples | Repointing brickwork, repairing cracked mortar joints | Plastering new walls, skimming over existing plaster |
Read Also: Hempcrete
| Verified Article By Er. Madhu Krishna Poudel |